Engineering Graphics: Unit III (a): Freehand Sketching
Methods of Sketching
Engineering Graphics (EG)
Engineering drawing mainly consists of straightlines and curved lines.
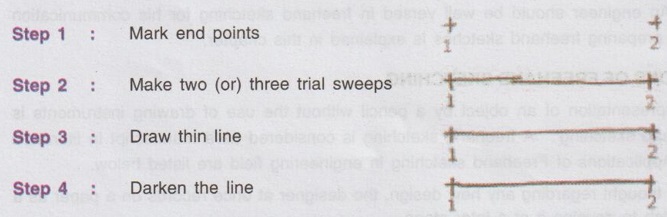
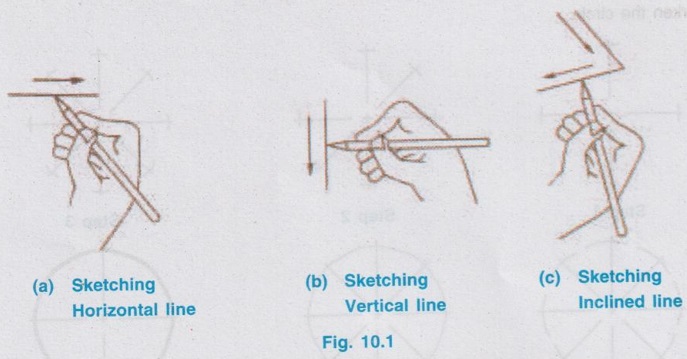
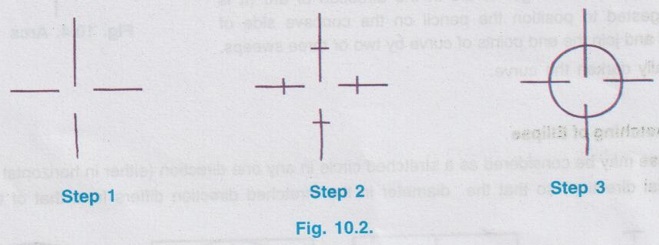
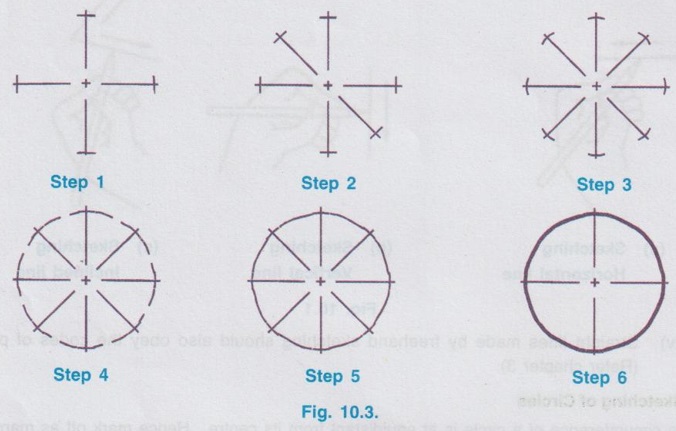
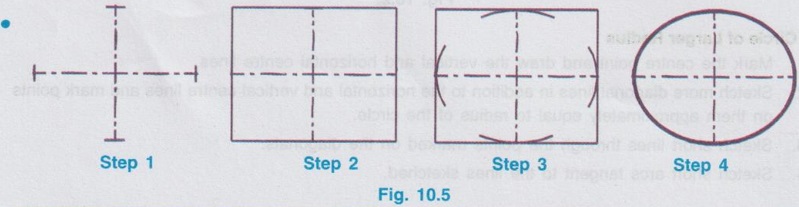
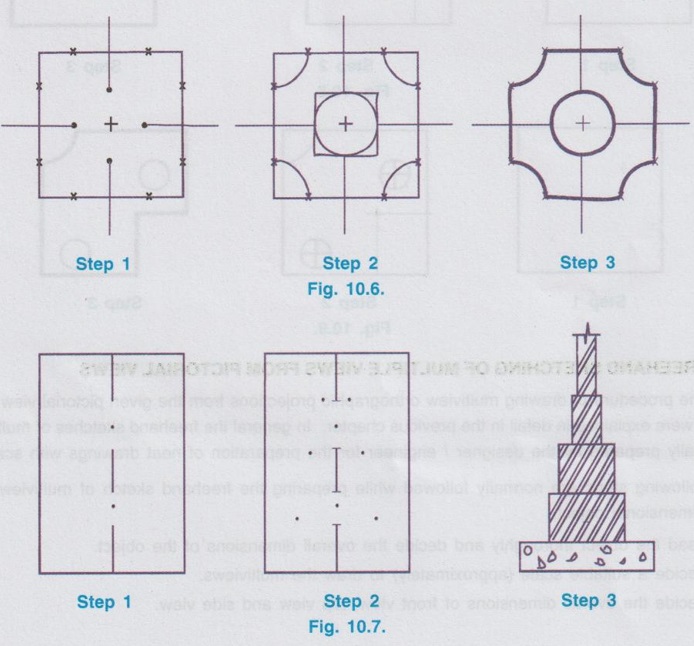
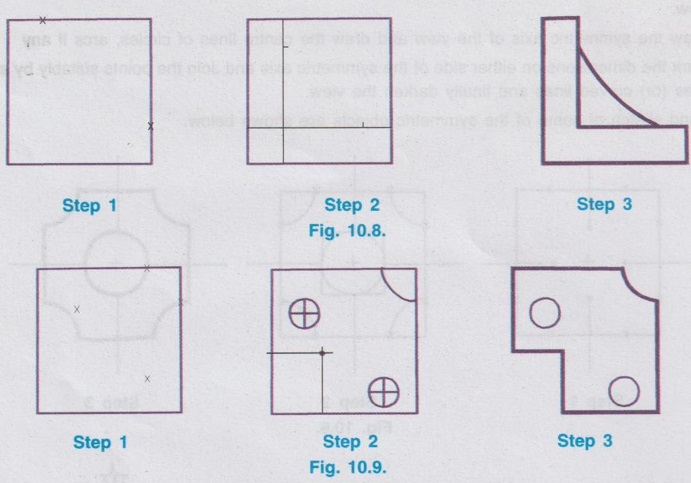
METHODS OF SKETCHING Engineering drawing mainly consists of straightlines and curved lines. The method of sketching of lines and curves is described below : Straightlines are drawn by making a succession of short distances or points or short straightlines. i) Mark the end points of the line with which the line to be joined. ii) First draw a very short line in the direction of line and then extend it in two (or) three sweeps. Note that the whole line should not be drawn in a single stroke. It must be drawn by two (or) three sweeps after making a line joining the end points by imagination. While making the initial sweeps, keep the eye in the direction of line not on the pencil point. iii) Finally darken the line by moving the pencil over the thin line. Note: i) Draw the horizontal lines with the motion of wrist and fore arm, from left to right (Fig. 10.1a) ii) Draw the vertical lines moving downwards, ie., from top to bottom (Fig. 10.1b) iii) Inclined lines are normally drawn from left to right when they are nearly horizontal and moving downward from top to bottom when they are nearly vertical. (Fig. 10.1c). iv) Straight lines made by freehand sketching should also obey the codes of practices (Refer chapter 3) The circumference of a circle is at equidistant from its centre. Hence mark off as many points as possible at a distance of radius from centre point to get a smooth circle. i) Circle of Smaller Radius 1. Mark the centre point and draw the vertical and horizontal centre lines. 2. Mark off the points on vertical and horizontal centre lines approximately equal to the radius of the circle. 3. Join these points by a smooth curve by few trials and then darken the circle. ii) Circle of Larger Radius 1. Mark the centre point and draw the vertical and horizontal centre lines. 2. Sketch more diagonal lines in addition to the horizontal and vertical centre lines and mark points on them approximately equal to radius of the circle. 3. Sketch short lines through the points marked on the diagonals. 4. Sketch short arcs tangent to the lines sketched. 5. Complete the circle with thin curved lines by joining the arcs. 6. Darken the circle. Arcs and curves are sketched by the same method similar to that of circles. 1. Locate the centre of arc. 2. Draw the tangents of proposed arc approximately. 3. Locate the end points of arc. 4. Start with short length of arc in the direction of arc (It is suggested to position the pencil on the concave side of arc) and join the end points of curve by two or three sweeps. 5. Finally darken the curve. Ellipse may be considered as a stretched circle in any one direction (either in horizontal direction (or) vertical direction) so that the diameter in the stretched direction differs from that of the other direction. To draw an ellipse, 1. Locate the centre point of ellipse and sketch a rectangle with sides equal to major and minor axes of ellipse. 2. Sketch short arcs tangential to the sides of the rectangle, drawn at the ends of the major and minor axes. 3. Complete the ellipse by extending the short arcs already drawn with two (or) three trials. 4. Finally darken the ellipse. Freehand sketch of a symmetric object, symmetrical about either x or y axis can be drawn by following the procedure given below : 1. Find the overall dimensions of the view and sketch rectangles of required sizes to enclose the view. 2. Draw the symmetric axis of the view and draw the centre lines of circles, arcs if any 3. Mark the dimensions on either side of the symmetric axis and Join the points suitably by straight lines (or) curved lines and finally darken the view. Freehand sketch of some of the symmetric objects are shown below. Freehand sketching of an unsymmetric object can be drawn by following the procedure given below: 1. Find the overall dimensions of the view, and sketch rectangles of required sizes to enclose the view. 2. Locate the critical points like centre of a circle, arc etc., interms of its co-ordinates with respect to the origin (normally the left bottom corner of a rectangle). 3. Start from any convenient edge (from left (or) from bottom) and draw the subcomponents of the object. Connect the components suitably and finally darken the view. Freehand sketching of some of the objects which are not symmetrical about any axis are shown below.1. Sketching of Straightlines
2. Sketching of Circles
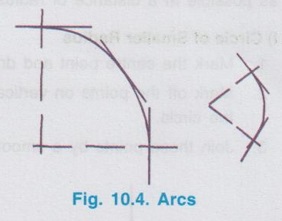
3. Sketching of Arcs and curves
4. Sketching of Ellipse
5. Sketching of symmetric objects
6. Sketching of Unsymmetric objects
Engineering Graphics: Unit III (a): Freehand Sketching : Tag: : Engineering Graphics (EG) - Methods of Sketching
Related Topics
Related Subjects
Engineering Graphics
GE3251 eg 2nd semester | 2021 Regulation | 2nd Semester Common to all Dept 2021 Regulation