Engineering Graphics: Unit IV (b): Development of Surfaces
Development of Sphere
Lune method, Zone method, Construction, Steps, Figure diagram, Example Problems | Engineering Graphics (EG)
Spheres have doubly curved surfaces. Hence the exact development of its surface cannot be obtained.
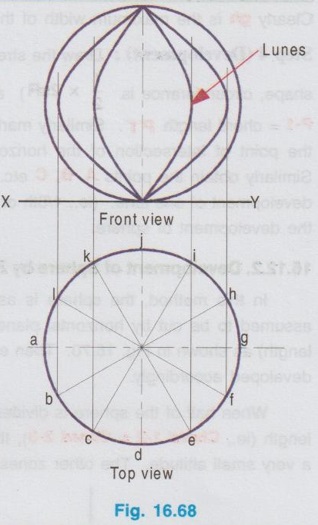
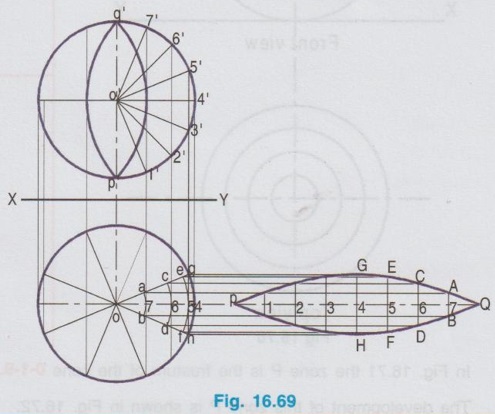
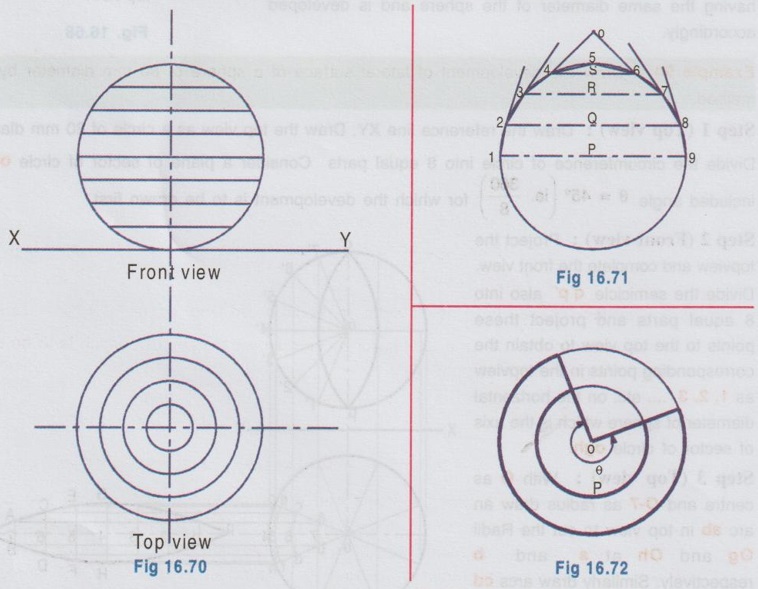
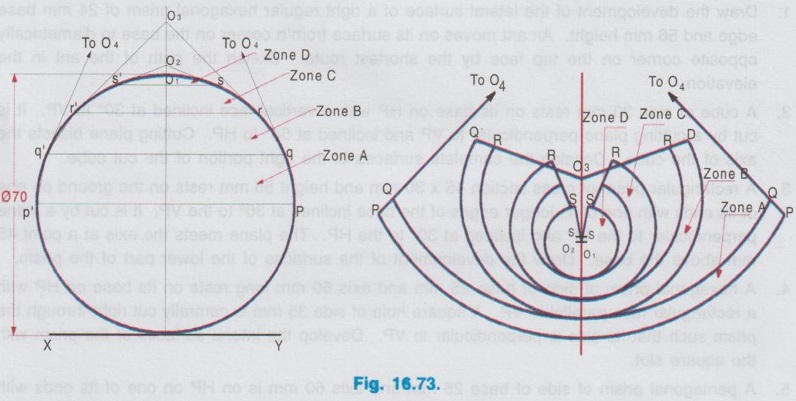
DEVELOPMENT OF SPHERE Spheres have doubly curved surfaces. Hence the exact development of its surface cannot be obtained. Only an approximation method is followed to develop a sphere. While developing the surface of a sphere to a plane by anhem approximate pattern, two methods, namely Lune method and si zone method are followed, named according to the cutting style of sphere into vertical or horizontal parts respectively. In this method the sphere is assumed to be cut vertically into number of pieces. It is assumed to be cut by vertical planes passing through a vertical axis so that the whole sphere is converted into a number of lunes. Normally 8 lunes; (If more accuracy is required 12 lunes) of equal size are assumed to cut as shown in Fig. 16.68. Then each piece is assumed as a part of a horizontal cylinder having the same diameter of the sphere and is developed accordingly. Example 50: Draw the development of lateral surface of a sphere of 80 mm diameter by Lune method. Step 1 (Top view): Draw the reference line XY. Draw the top view as a circle of 80 mm diameter. Divide the circumference of circle into 8 equal parts Consider a plane of sector of circle ogh, at included angle θ = 45° (ie. 360/8) for which the development is to be drawn first. Step 2 (Front view): Project the topview and complete the front view. Divide the semicicle q'p' also into 8 equal parts and project these points to the top view to obtain the corresponding points in the topview as 1, 2, 3,.... etc. on the horizontal diameter of sphere which is the axis of sector of circle ogh. Step 3 (Top view): With O as centre and O-7 as radius draw an arc ab in top view to cut the Radii Og and Oh at a and b respectively. Similarly draw arcs cd and ef with 0-6 and 0-5 as radius respectively. Clearly gh is the maximum width of the lune considered at radius O-4. Step 4 (Development): Draw the stretch-out line PQ of length πR (Since the lune is of semicircular shape, circumference is ½ × 2πR) and passing through the point O. Mark the point 1 such that P-1 = chord length P1'. Similarly mark the points 2, 3, 4 etc. on the line PQ. Obtain the point G as the point of intersection of the horizontal line through g and the vertical line through 4 on PQ. Similarly obtain the points A, B, C etc. Join these points by a smooth curve to get the approximate development of one lune. (ie., 1/8th of sphere). Eight such developments may be drawn to complete the development of sphere. In this method, the sphere is assumed to be cut horizontally into number of pieces. It is assumed to be cut by horizontal planes to form a series of zones of equal widths (ie equal chord length) as shown in Fig. 16.70. Then each zone is assumed as a frustum of a right circular cone and developed accordingly. When half of the sphere is divided into 4 equal zones as shown in Figure 16.71 of equal chord length (ie., Chord 1-2 = Chord 2-3), the topmost zone is in the form of a cone of a large base and a very small altitude. The other zones are in the form of a frustum of cone as shown in Fig. 16.71. In Fig. 16.71 the zone P is the frustum of the cone 0-1-9. The development of this zone P is shown in Fig. 16.72. The other frustum of cones Q and R are also developed in the same manner, where as the top most zone S is developed like cone. After obtaining the developments of zones in the upper half of the sphere, the developments of zones in the lower half of the sphere can be drawn as mirror image. Finally the development of the different zones are positioned and rolled suitably to form the required sphere. Example 51: Draw the development of lateral surface of a sphere of 70 mm diameter by zone method. Step 1 (Front view) 1. Draw the reference axis XY. 2. Draw the front view of the sphere as a circle of diameter 70 mm. 3. Divide the circle into 8 equal parts horizontally. Consider the 4 zones in the upper half of circle. Let these zones be A, B, C and D. Note that these zones have equal width, ie, equal chord length, ie., p′q′ = q'r' and so on. 4. Now each zone is treated as a frustum of a cone except the zone D, which is to be taken as supe a cone of larger base and small altitude. 5. Locate the apex of the cones of different zones as O1, O2, O3 and O4. Step 2 (Development) 6. Draw the vertical axis of development on which the apex points O1, O2 etc are to be marked. 7. The development of each zone is drawn with reference to this vertical axis and taking the corresponding radius. For example to draw the development of zone B, draw an arc QQ with O3 as centre and O3p′ as radius considering the subtended angle. Also draw an another arc RR with O3 as centre and radius equal to O3p′ - chord lengths) Now QQRR represents the development of the zone B. 8. Similarly obtain the developments of other zones A and B, but draw the development of Zone D similar to the development of a right circular cone. 9. Similarly obtain the development of zones in the lower half of the sphere as mirror image. Finally the development of all the zones are positioned and rolled suitably to form the required sphere.1. Development of Sphere by Lune method
2. Development of Sphere by Zone method
Engineering Graphics: Unit IV (b): Development of Surfaces : Tag: : Lune method, Zone method, Construction, Steps, Figure diagram, Example Problems | Engineering Graphics (EG) - Development of Sphere
Related Topics
Related Subjects

Engineering Graphics
GE3251 eg 2nd semester | 2021 Regulation | 2nd Semester Common to all Dept 2021 Regulation